Please login to access this page.
Table of Contents
Replacing a TetherBox Drive
If you've purchased or been sent a replacement drive under warranty, we'll provide specific instructions for your unit. This page offers general guidance for common TetherBox form factors.
Tip: Before starting, note your TetherBox serial number from Admin → TetherBoxes. You'll need this during activation of the new drive.
Raspberry Pi Units
Raspberry Pi-based TetherBoxes use a MicroSD card for the operating system. Storage is provided by an external USB drive or, on some units, an NVMe drive via a HAT (expansion board).
MicroSD (OS) access varies by enclosure:
- Open enclosures - The MicroSD slot is directly accessible on the side of the Pi. Grip the edge of the card and pull it straight out (there's no spring mechanism).
- Sealed enclosures - You may need to remove 2-4 screws from the case lid or base plate to access the MicroSD slot.
NVMe drive access (if equipped):
- Remove the case screws to access the NVMe HAT mounted on top of the Pi
- The NVMe drive slots into the HAT and is secured with a small screw
Replacement steps:
- Power down the TetherBox and disconnect power
- Access the MicroSD slot or NVMe HAT (remove case screws if needed)
- Remove the old MicroSD card or NVMe drive
- Insert the replacement (MicroSD contacts facing toward the board; NVMe at an angle then secure with screw)
- Reassemble any removed parts
- Reconnect power
Mini PC / NUC Units
Mini PC and NUC-style TetherBoxes typically use 2.5" SATA SSDs or M.2 NVMe drives.
Common access methods:
- Bottom panel - Remove 4 screws from the bottom of the unit to access the drive caddy or NVMe slot on the motherboard
- Side panel - Some units have a removable side panel secured with 2-4 screws
Replacement steps:
- Power down the TetherBox and disconnect all cables
- Remove the bottom or side panel screws
- For 2.5" SATA drives - Unclip or unscrew the drive from its caddy, disconnect the SATA cable, and reverse the process with the new drive
- For M.2 NVMe drives - Remove the retaining screw, slide out the old drive at an angle, insert the new drive, and secure with the screw
- Reassemble the panel
- Reconnect cables and power
TetherBox Pico
The TetherBox Pico uses a 2.5" SATA SSD. You will need a drive pre-loaded with TetherX software, which includes a serial number sticker.
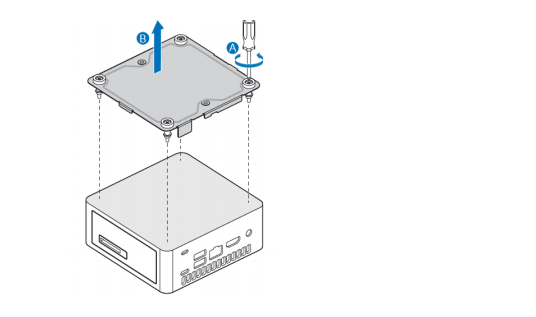
Opening the TetherBox Pico
Unscrew the four screws on the cover (A) and lift the cover off (B).
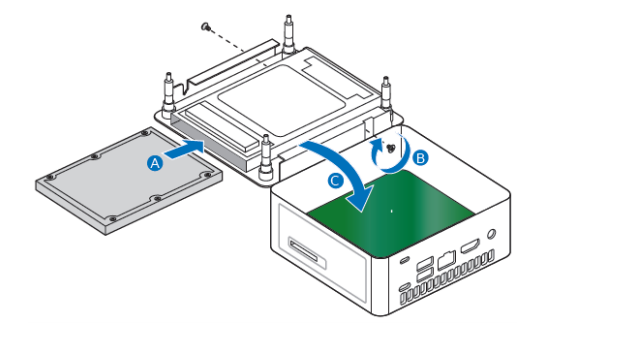
Installing the SSD
- Slide the new 2.5" drive into the drive bay, ensuring the DATA connections are fully seated into the connectors on the SATA daughter card (A)
- Secure the drive to the bay using the two small silver screws included with the replacement drive (B)
- Set the drive cage bracket inside the TetherBox (C)
Closing the TetherBox Pico
Replace the cover and secure with the four screws removed earlier.
Rack Mount Units
Rack mount TetherBoxes typically have tool-free or screw-secured access panels.
Common access methods:
- Thumb screws - Loosen the thumb screws on the rear of the unit and slide the top cover off toward the back
- Phillips screws - Remove 2-4 Phillips screws from the rear panel, then slide the cover off
Replacement steps:
- Power down the TetherBox
- Remove the top cover (thumb screws or Phillips screws on rear)
- Locate the drive bay - most rack units have hot-swap bays or internal SATA/NVMe connections
- For hot-swap bays - Release the drive caddy latch, slide out, swap drives, and slide back in
- For internal drives - Disconnect power and data cables, remove mounting screws, and reverse with the new drive
- Replace the top cover
- Power on
Activating the New Drive
After physically installing the new drive:
- Power on the TetherBox and wait for it to boot (the new drive will be blank)
- Go to the TetherX activation page
- Enter the TetherBox serial number
- When prompted, select Replace Existing Unit if this drive replaces a failed unit that was previously activated
- Complete the activation wizard
Tip: Selecting "Replace Existing Unit" automatically transfers most of your configuration to the new drive - see Replacing a TetherBox for full details.
Need Help?
If you're unsure about your specific TetherBox model or need hands-on guidance, contact us with your serial number and we'll provide detailed instructions for your unit.
Related Articles
- TetherBox Recording Capacity - Storage options and capacity planning
- Hardware Specifications - Detailed specs for TetherBox models
- Replacing a TetherBox - Replacing the entire unit (not just the drive)
Referenced in: